Hi all.
Time for another tutorial. Recently I was trying to modify a tilemap returned from a typical public map overlay server (such as openstreetmap.org) - basically I needed a way to change black areas of the tile into transparent so that I could nicely overlay it on top of MKMapView. I searched for this for a while, found some solutions but did not really work as I wanted. Some examples used MKTileOverlayRenderer. Somehow that gave me weird results that I do not understand.

Wednesday, November 18, 2015

Saturday, October 3, 2015
LONG LIVE XIBs!!!! Create an iOS app without storyboards in XCode
Are you one of those devs who don't like Storyboard? I didn't even bother to learn about Storyboards and how to use them. Call me stubborn noob that's ok. But I am so used to programmatically create things on XCode so storyboards are not my thang.
So how do you do this with latest XCode? If you go to New Project LO AND BEHOLD no such thing as a project without storyboards. All of them has storyboards. Unless you go with the absolute empty project.
Sunday, September 27, 2015
SKScrollView: SKSpriteKit ScrollView for Games Levels
Hey guys how are you doing? Hope you are doing great.
I have a sample project to share. Well, as usual, I wanted to do something and then search around and most of available solution is way too complicated or not to my liking. So I MAKE ONE MYSELF. YAYYYYYYY xD Great way to spend my Sunday evening with a cuppa coffee.
I have a sample project to share. Well, as usual, I wanted to do something and then search around and most of available solution is way too complicated or not to my liking. So I MAKE ONE MYSELF. YAYYYYYYY xD Great way to spend my Sunday evening with a cuppa coffee.
Wednesday, August 12, 2015
SKSpriteKit: How to fill SKScene background with a Texture? (Code Snippet)
Yo guys.
Just submitted my latest iOS game. Check out the demo video here: FreakOut - Tribute to Breakout (iOS Game)
Anyways, I am updating one of my apps - Particle X to include the SpriteKit support. One thing that I need is to put a background texture to the SKScene background. In a normal UIView, we can simply specify self.view.backgroundColor = [UIColor colorWithPatternImage:yourUIImageHere]; and iOS will repeat that texture throughout the UIView. Which is cool.
But unfortunately there is no such method in SKScene.
Sunday, June 7, 2015
How To: SKLabelNode Border Outline Quick Hack
Hey guys.
Today I would like to share you a simple hack on SKLabelNode. Since it is a simple snippet, there will be no project to download.
I am making my latest game (FreakOut) and was in need of SKLabelNode with outline. There are some 3rd party codes but I just want a simple and quick hack for it. So I made up this method:
Today I would like to share you a simple hack on SKLabelNode. Since it is a simple snippet, there will be no project to download.
I am making my latest game (FreakOut) and was in need of SKLabelNode with outline. There are some 3rd party codes but I just want a simple and quick hack for it. So I made up this method:
Thursday, January 29, 2015
Atari Online Voice Synthesizer
WAZZZUUPPPPP
This is not a tutorial. But I have something cool for you. See I am in the making of my 5th iOS Game, then in need of some 8 bit voice. Freesound.org, gives me some. But I need to have it say a certain customized words. So I went on and search for the Atari Simulator for Mac. Found some, but I can't figure out how the heck do I install the speech simulator.
Upon searching further I encountered this cool online Voice Synthesizer that sounds exactly like the one I want - Atari version! So without further delay here is:
Friday, December 5, 2014
Multiline SKLabelNode? Hell Yes Please XD
Woah. Another Noobies Tutorial yayyyyyy....
Apple, naughty Apple. You made SpriteKit and SKLabelNode, but not make multiline labelnode. This is supposed to be expected!! OMG!! UILabel has multiline function, why not SKLabelNode?
Ok, lets not get crazy. Relax I am here to solve your woes.
Apple, naughty Apple. You made SpriteKit and SKLabelNode, but not make multiline labelnode. This is supposed to be expected!! OMG!! UILabel has multiline function, why not SKLabelNode?
Ok, lets not get crazy. Relax I am here to solve your woes.
Thursday, June 19, 2014
How To: Create a Dynamic "More Apps..." Page & How to Customize UITableView Cells

BOO!!
WTF man. This short movie is super scary. I hope they make it into a longer one. It is called "Lights Out". You can watch it here:
Sunday, February 9, 2014
iOS: Designing Particles with CAEmitterLayer / CAEmitterCells
Since iOS5, iOS incorporates an easy way to create particles in your app.

This is good news, since we no longer need to delve into the complicated world of
OpenGLES or cocos2d or other engine.
However, hard coding particles can be a pain since there are quite many parameters
to play with. I wanted to incorporate this particle system into my old game - Blast The Droids,
and while playing with it, I find I am stuck in the "change one parameter, and execute" loop.
It takes hours(!) to design a simple explosion.
This is good news, since we no longer need to delve into the complicated world of
OpenGLES or cocos2d or other engine.
However, hard coding particles can be a pain since there are quite many parameters
to play with. I wanted to incorporate this particle system into my old game - Blast The Droids,
and while playing with it, I find I am stuck in the "change one parameter, and execute" loop.
It takes hours(!) to design a simple explosion.
Tuesday, December 3, 2013
How To: Make Custom iOS Number Keyboard on iPad
OMG I just submitted my latest app. XD

So today, I am going to tutor wonderful programmers to make a custom UIKeyboard buttons. In particular, we are making numbers keyboard for iPad only. As we know, iPads don't have a "numbers only" keyboard. Since iPad is like a PC really and generally users must be provided with full keyboard. But on some apps, surely we want to limit input only to numbers. So here's what it's gonna look like.
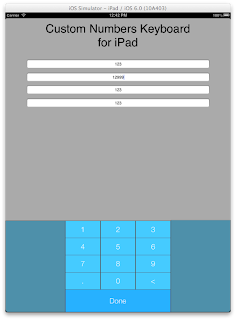
Ugly? Well, I leave that part for you to make it pretty then. I am no artist. ;)
As noobs, we don't need to go into actually customizing the UIKeyboard (because that probably be illegal and also it is probably too complicated for us, noobs) So how do we accomplish things the easy way? CHEAT! OF course!


Ok now if we run the app, whenever we tap on any textfield, our custom keyboard will pops up from the bottom automatically (like default keyboard)! But if you tap on any buttons, it will do nothing. So how do we point the keys to input to the active uitextfield?
We are going to need to make a custom method to tell us which textfield is active. Enter the following method:
The key property is "isFirstResponder". Again we make use of the iteration loop to find out who is the first responder (ie. the active control) and return that view to the caller. Now we can write the keyTapped method!
At the top line, we do a typecasting to "sender" so that we can get the UIButton's tag property. sender is basically an ID of who is calling this method. Since we're linking all our keyboard buttons to this method, so all senders are actually UIButtons.
Next we do another typecasting so that we can get the UITextField that is currently on focus. The return object pointer of findFirstResponder is a UIView. So we do the typecasting as UITextField so that we can change the active textfield's property.
Using switch statement, we detect which button is tapped, and do the necessary actions. Here are all of your custom key functions that you must write by yourself. Here my buttons are just simply typing numbers into the active textfields.
Finally, to dismiss our keyboard, again we use the iteration loop and resignFirstResponder for all views.
And that is all you need! Ok now we're done.
So today, I am going to tutor wonderful programmers to make a custom UIKeyboard buttons. In particular, we are making numbers keyboard for iPad only. As we know, iPads don't have a "numbers only" keyboard. Since iPad is like a PC really and generally users must be provided with full keyboard. But on some apps, surely we want to limit input only to numbers. So here's what it's gonna look like.

Ugly? Well, I leave that part for you to make it pretty then. I am no artist. ;)
As noobs, we don't need to go into actually customizing the UIKeyboard (because that probably be illegal and also it is probably too complicated for us, noobs) So how do we accomplish things the easy way? CHEAT! OF course!

Hahah!
Firstly, what we need to do is design the keyboard by using a single UIView and UIButtons. You can make your own custom button images and apply it. But for me, I am going to use UIButton dynamic images that are created on the fly. Ok sue me I am lazy to draw button images. :P
We are going to use the same custom method in PREVIOUS TUTORIAL (with a little modifications) to create these buttons so that they appear "nice" in all devices and in all resolutions! I am not going to delve into making these dynamic UIButton images (refer prev tutorial for that), but rather concentrate on the functionality of it instead.
Now, each UIButtons have unique functions, so we need to id them using tag property and link all of them to a single method. For my case, I simply put the button tags from 11 - 22 (a total of 12 buttons). There is also a "Done" button to dismiss the keyboard but we'll get to it later. Below is a picture of where to assign the tags.

Once you tagged all UIButtons with unique numbers (it can be any numbers really, your choice), declare a UIView as an IBOutlet for the custom keyboard:
@interface ViewController : UIViewController {

 IBOutlet UIView *customKeyboard;

}

@property (nonatomic, retain)  UIView *customKeyboard;
Make sure to synthesize it and connect the keyboard UIView that you designed earlier.
Next, implement 2 methods:
-(IBAction)keysTapped:(id)sender;

-(IBAction)dismissKeyboard:(id)sender;
Link keysTapped to all the keyboard buttons (except Done button). And link dismissKeyboard to the Done button.
Now here's the trick. When we tap on any UITextField, normally a standard Keyboard will appear. To override the standard keyboard, we make use of UITextField's property inputView and points it to our custom keyboard.
But how do we do this efficiently? What if we have 100 UITextFields? Do we need to write 100 lines of codes to point all UITextFields to our custom keyboard? No of course (but you thought of that didn't you, you noobs you :D)
Smart way to do it is to ITERATE through subviews of our viewcontroller and if we find UITextFields, then assign it. Here's the code:
for(UIView *v in [self.view subviews]) {

         if ([v isKindOfClass:[UITextField class]]) {

             UITextField *tmp = (UITextField *)v; // typecasting so that we can use inputView property

             tmp.inputView = customKeyboard; // here we assign it

         }

}
5 lines of codes! BOOM!! No we're not done. :P
NOTE: We can use for(UIView *v in [self.view subviews]) { } to Iterate through any objects in our viewController for any other purpose too!
Ok now if we run the app, whenever we tap on any textfield, our custom keyboard will pops up from the bottom automatically (like default keyboard)! But if you tap on any buttons, it will do nothing. So how do we point the keys to input to the active uitextfield?
We are going to need to make a custom method to tell us which textfield is active. Enter the following method:
- (UIView *)findFirstResponder:(UIView *)view {

    if ([view isFirstResponder]) return view; // Base case

    for (UIView *subView in [view subviews]) {
        if ([subView isFirstResponder]) return subView;
    }

    return nil;
}
The key property is "isFirstResponder". Again we make use of the iteration loop to find out who is the first responder (ie. the active control) and return that view to the caller. Now we can write the keyTapped method!
-(IBAction)keysTapped:(id)sender {
    UIButton *tmp = (UIButton*)sender;

    UITextField *inputTo = (UITextField *)[self findFirstResponder:self.view];

    int wat = tmp.tag;

    switch (wat) {
        case 11:
            inputTo.text = [NSString stringWithFormat:@"%@1", inputTo.text];
            break;
        case 12:
            inputTo.text = [NSString stringWithFormat:@"%@2", inputTo.text];
            break;
        case 13:
            inputTo.text = [NSString stringWithFormat:@"%@3", inputTo.text];
            break;
        case 14:
            inputTo.text = [NSString stringWithFormat:@"%@4", inputTo.text];
            break;
        case 15:
            inputTo.text = [NSString stringWithFormat:@"%@5", inputTo.text];
            break;
        case 16:
            inputTo.text = [NSString stringWithFormat:@"%@6", inputTo.text];
            break;
        case 17:
            inputTo.text = [NSString stringWithFormat:@"%@7", inputTo.text];
            break;
        case 18:
            inputTo.text = [NSString stringWithFormat:@"%@8", inputTo.text];
            break;
        case 19:
            inputTo.text = [NSString stringWithFormat:@"%@9", inputTo.text];
            break;
        case 20:
            inputTo.text = [NSString stringWithFormat:@"%@0", inputTo.text];
            break;
        case 21:
            inputTo.text = [NSString stringWithFormat:@"%@.", inputTo.text];
            break;
        case 22: {


            if ([inputTo.text length]>0) {

                NSString *newString = [inputTo.text substringToIndex:[inputTo.text length]-1];

                inputTo.text = newString;

            }

        }break;
        default:
            break;
    }

}
At the top line, we do a typecasting to "sender" so that we can get the UIButton's tag property. sender is basically an ID of who is calling this method. Since we're linking all our keyboard buttons to this method, so all senders are actually UIButtons.
Next we do another typecasting so that we can get the UITextField that is currently on focus. The return object pointer of findFirstResponder is a UIView. So we do the typecasting as UITextField so that we can change the active textfield's property.
Using switch statement, we detect which button is tapped, and do the necessary actions. Here are all of your custom key functions that you must write by yourself. Here my buttons are just simply typing numbers into the active textfields.
Finally, to dismiss our keyboard, again we use the iteration loop and resignFirstResponder for all views.
-(IBAction)dismissKeyboard:(id)sender {
    for (UIView *subView in [self.view subviews]) {
        [subView resignFirstResponder];
    }
}
And that is all you need! Ok now we're done.
Subscribe to:
Posts (Atom)