Tuesday, December 3, 2013

How To: Make Custom iOS Number Keyboard on iPad

OMG I just submitted my latest app. XD


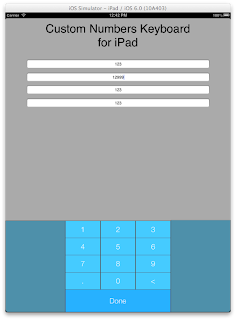
So today, I am going to tutor wonderful programmers to make a custom UIKeyboard buttons. In particular, we are making numbers keyboard for iPad only. As we know, iPads don't have a "numbers only" keyboard. Since iPad is like a PC really and generally users must be provided with full keyboard. But on some apps, surely we want to limit input only to numbers. So here's what it's gonna look like.


Ugly? Well, I leave that part for you to make it pretty then. I am no artist. ;)

As noobs, we don't need to go into actually customizing the UIKeyboard (because that probably be illegal and also it is probably too complicated for us, noobs) So how do we accomplish things the easy way? CHEAT! OF course!

Hahah!

Firstly, what we need to do is design the keyboard by using a single UIView and UIButtons. You can make your own custom button images and apply it. But for me, I am going to use UIButton dynamic images that are created on the fly. Ok sue me I am lazy to draw button images. :P

We are going to use the same custom method in PREVIOUS TUTORIAL (with a little modifications) to create these buttons so that they appear "nice" in all devices and in all resolutions!  I am not going to delve into making these dynamic UIButton images (refer prev tutorial for that), but rather concentrate on the functionality of it instead.

Now, each UIButtons have unique functions, so we need to id them using tag property and link all of them to a single method. For my case, I simply put the button tags from 11 - 22 (a total of 12 buttons). There is also a "Done" button to dismiss the keyboard but we'll get to it later. Below is a picture of where to assign the tags.


 Once you tagged all UIButtons with unique numbers (it can be any numbers really, your choice), declare a UIView as an IBOutlet for the custom keyboard:


@interface ViewController : UIViewController {

 IBOutlet UIView *customKeyboard;

}

@property (nonatomic, retain)  UIView *customKeyboard;
Make sure to synthesize it and connect the keyboard UIView that you designed earlier.


Next, implement 2 methods:


-(IBAction)keysTapped:(id)sender;

-(IBAction)dismissKeyboard:(id)sender;


Link keysTapped to all the keyboard buttons (except Done button). And link dismissKeyboard to the Done button.

Now here's the trick. When we tap on any UITextField, normally a standard Keyboard will appear. To override the standard keyboard, we make use of UITextField's property inputView and points it to our custom keyboard.

But how do we do this efficiently? What if we have 100 UITextFields? Do we need to write 100 lines of codes to point all UITextFields to our custom keyboard? No of course (but you thought of that didn't you, you noobs you :D)

Smart way to do it is to ITERATE through subviews of our viewcontroller and if we find UITextFields, then assign it. Here's the code:


for(UIView *v in [self.view subviews]) {

         if ([v isKindOfClass:[UITextField class]]) {

             UITextField *tmp = (UITextField *)v; // typecasting so that we can use inputView property

             tmp.inputView = customKeyboard; // here we assign it

         }

}


5 lines of codes! BOOM!! No we're not done. :P

NOTE: We can use for(UIView *v in [self.view subviews]) { } to Iterate through any objects in our viewController for any other purpose too!

Ok now if we run the app, whenever we tap on any textfield, our custom keyboard will pops up from the bottom automatically (like default keyboard)! But if you tap on any buttons, it will do nothing. So how do we point the keys to input to the active uitextfield?

We are going to need to make a custom method to tell us which textfield is active. Enter the following method:


- (UIView *)findFirstResponder:(UIView *)view {
    
    if ([view isFirstResponder]) return view; // Base case
    
    for (UIView *subView in [view subviews]) {
        if ([subView isFirstResponder]) return subView; 
    }
    
    return nil;
}

The key property is "isFirstResponder". Again we make use of the iteration loop to find out who is the first responder (ie. the active control) and return that view to the caller. Now we can write the keyTapped method!


-(IBAction)keysTapped:(id)sender {
    UIButton *tmp = (UIButton*)sender;
    
    UITextField *inputTo = (UITextField *)[self findFirstResponder:self.view];
    
    int wat = tmp.tag;
    
    switch (wat) {
        case 11:
            inputTo.text = [NSString stringWithFormat:@"%@1", inputTo.text];
            break;
        case 12:
            inputTo.text = [NSString stringWithFormat:@"%@2", inputTo.text];
            break;
        case 13:
            inputTo.text = [NSString stringWithFormat:@"%@3", inputTo.text];
            break;
        case 14:
            inputTo.text = [NSString stringWithFormat:@"%@4", inputTo.text];
            break;
        case 15:
            inputTo.text = [NSString stringWithFormat:@"%@5", inputTo.text];
            break;
        case 16:
            inputTo.text = [NSString stringWithFormat:@"%@6", inputTo.text];
            break;
        case 17:
            inputTo.text = [NSString stringWithFormat:@"%@7", inputTo.text];
            break;
        case 18:
            inputTo.text = [NSString stringWithFormat:@"%@8", inputTo.text];
            break;
        case 19:
            inputTo.text = [NSString stringWithFormat:@"%@9", inputTo.text];
            break;
        case 20:
            inputTo.text = [NSString stringWithFormat:@"%@0", inputTo.text];
            break;
        case 21:
            inputTo.text = [NSString stringWithFormat:@"%@.", inputTo.text];
            break;
        case 22: {
            
            
            if ([inputTo.text length]>0) {
                
                NSString *newString = [inputTo.text substringToIndex:[inputTo.text length]-1];
                
                inputTo.text = newString;
                
            }
            
        }break;
        default:
            break;
    }

}


At the top line, we do a typecasting to "sender" so that we can get the UIButton's tag property. sender is basically an ID of who is calling this method. Since we're linking all our keyboard buttons to this method, so all senders are actually UIButtons.

Next we do another typecasting so that we can get the UITextField that is currently on focus. The return object pointer of findFirstResponder is a UIView. So we do the typecasting as UITextField so that we can change the active textfield's property.

Using switch statement, we detect which button is tapped, and do the necessary actions. Here are all of your custom key functions that you must write by yourself. Here my buttons are just simply typing numbers into the active textfields.

Finally, to dismiss our keyboard, again we use the iteration loop and resignFirstResponder for all views.


-(IBAction)dismissKeyboard:(id)sender {
    for (UIView *subView in [self.view subviews]) {
        [subView resignFirstResponder];
    }
}

And that is all you need! Ok now we're done.

Tuesday, October 29, 2013

How To: Convert Your App Into Flat Design (iOS7) Easily

What's up?

The sky.


iOS7 Flat Design. Many thought flat design is easy. But after trying to design it myself I find that flat design is WAY HARDER than Skeumorphic design. With flat design, every single aspect of the design MUST come together in perfect harmony to produce a cool looking and beautiful interface.

As I am updating my apps to the flat design, I created a few custom methods that makes converting apps into flat design a walk in the park (Ok, walking in the park is probably not easy, and not safe either, you'd get mugged, or might step on dog's poo, etc, but you get my meaning :P)

I made a fake Application with the normal old design. The app doesn't do anything. It just shows  some controls on it. Here how it looks like:
Now, with a single loop we will turn all these into a flat design User Interface. It's like magic :D

Since we want to be able to call the method to convert all controls into flat designed controls, we better create a class, so that we can simply call the class from other ViewControllers. For me, I have one class that contains all the general and common methods, it is called "CommonMethods.h and .m".

So how are we going to do this?

The secret to this is to create images ON THE FLY and use it as "custom" backgrounds for each of the controls. So in each of your existing Viewcontrollers, you only need to call these loops in the viewDidLoad method:

    
for(UIView *v in [self.view subviews]) {
        if ([v isKindOfClass:[UIButton class]]) {
            [CommonMethods createCustomBtn:(UIButton *)v];
        }
        
        if ([v isKindOfClass:[UISegmentedControl class]]) {
            [CommonMethods createCustomSegmented:(UISegmentedControl *)v];
        }
        
        if ([v isKindOfClass:[UISlider class]]) {
            [CommonMethods createCustomSlider:(UISlider *)v];
        }
    }

Isn't that cool? Let's take a look at one of the CommonMethods' custom class method - createCustomBtn. This method is custom made - you decide the name of the method and what it does. In this case, we name it createCustomBtn because we want it to uh.. well, create a custom button for us. :P

Flat design is great because, it is simple. There are no fancy shadows, no fancy textures, there are just colors. And sometimes simple gradients. Hence we can make use CoreGraphics to create these designs dynamically and apply to each controls on the fly. Genius? I know. Thanks.

So for all buttons, what we want to do is create individual buttons images and then apply it to them. To create a rectangle gradient, we use the following code (read the comments for explanation):


CGColorSpaceRef rgb = CGColorSpaceCreateDeviceRGB(); // creates an RGB color space.
    
    // gradient colors from top to bottom (only 2 colors allowed)
    CGFloat colors[] =
    {
        133.0 / 255.0, 149.0 / 255.0, 96.0 / 255.0, 1.00,
        90.0 / 255.0,  109.0 / 255.0, 49.0 / 255.0, 1.00,
    };
    // initiate the gradient
    CGGradientRef gradient = CGGradientCreateWithColorComponents(rgb, colors, NULL, sizeof(colors)/(sizeof(colors[0])*4));
    CGColorSpaceRelease(rgb);
    
    // start image context (so we can draw on it) with the same size as the button
    UIGraphicsBeginImageContext(myButton.frame.size);
    
    UIImage *btnImage;
       
    // get the context for CoreGraphics
    CGContextRef ctx = UIGraphicsGetCurrentContext();
    
    // start and end point of gradient
    CGPoint startPoint = CGPointMake(0,0);
    CGPoint endPoint = CGPointMake(0, myButton.frame.size.height);
    
    // DRAW the gradient 
    CGContextDrawLinearGradient(ctx, gradient, startPoint, endPoint, kCGGradientDrawsBeforeStartLocation);
 
    // make image out of bitmap context
    btnImage = UIGraphicsGetImageFromCurrentImageContext();
    
    // free the context
    UIGraphicsEndImageContext();


Easy right? Now that we got the rectangular colored gradient as an image, we then can apply this image as the button's background image. Also, if we want the rounded corner on the button, we set the button layer's cornerRadius property to 10.0 or other float values. Remember to setClipsToBound to YES otherwise the radius will not work.


    [myButton setBackgroundImage:btnImage forState:UIControlStateNormal];
// you can also create another image of different color using the code above and
// apply it to other states of the button like UIControlStateSelected
    myButton.clipsToBounds = YES;
    myButton.layer.cornerRadius = 5.0;
    // Change font to iOS7 common font and color to white
    UIFont *myFont = [UIFont fontWithName:@"Helvetica Neue" size:18];
    [[myButton titleLabel] setFont:myFont];
    [[myButton titleLabel] setTextColor:[UIColor whiteColor]];


DONE! Woah? So easy. What you do is just customize your button as you like once in CommonMethods.m and call the loop in all viewController's viewDidLoad method. And all your buttons now are Flat Designed!


Open up CommonMethods.m to see other customizations. And here is the flat designed new User Interface! Cool eh?

What's more cool, is that now your app bundle doesn't even have ANY user interface images. Non of that btn.png, btn@2.png, btn@2x~ipad.png, btn~ipad.png ANYMORE!

Based on my example, you could convert most objects the same way (but you gotta write code by yourself).


This is an easy way for us noobs to convert our apps' interface. But if you are writing a new app, the way to go is subclassing your controls. But that, is another topic altogether.

So that's all and good luck updating your app to flat design app!.

Oh yeah, you need to choose colors carefully for a flat design - This site http://flatuicolors.com is really cool where you can find Flat Colors easily.

Saturday, April 6, 2013

Free Custom UISwitch - Flexible Colors and Size

What's up wonderful people?

This is NOT a tutorial. :D

However there is a downloadable Sample Code. I'd like to give away this little custom UISwitch-like class I made. I realize there are already other custom UISwitches that are cool (like https://github.com/domesticcatsoftware/DCRoundSwitch), however mine consists of simple readily available UIControls like UIViews and UILabels, and it has MORE FLEXIBILITY in its components.
Also, since this component is created entirely on UIKit, it will look nice in all resolution (retina or not), ipad or whatever.


Here is the screenshot of samples of custom UISwitch that can be created with this class:


Using this class is simple.

1. Copy Switchy.h and Switchy.m to your folder and add them to your project.
Then import the Switchy.h in your viewcontroller's header.

#import "Switchy.h"

2. Add QuartzCore.framework to your project.

2. Declare the switch it in your header.

Switchy *mySwitch;

3. Create it in viewDidLoad and customize everything in the initWithFrame custom method.


mySwitch = [[Switchy alloc] initWithFrame:CGRectMake(0, 0, 79, 27) withOnLabel:@"ON" andOfflabel:@"OFF"
                     withContainerColor1:[UIColor colorWithRed:0.1 green:0.7 blue:1.0 alpha:1.0]
                      andContainerColor2:[UIColor colorWithRed:0.1 green:0.7 blue:0.9 alpha:1.0]
                          withKnobColor1:[UIColor colorWithRed:1.0 green:1.0 blue:1.0 alpha:1.0]
                           andKnobColor2:[UIColor colorWithRed:0.7 green:0.7 blue:0.7 alpha:1.0] withShine:YES];
    

4. Hook a method of your own when user toggles the switch:

 
[sw1 addTarget:self action:@selector(customMethod) forControlEvents:UIControlEventTouchUpInside];


5. Add to your viewcontroller's view and position it anywhere.


[self.view addSubview:sw1];
    sw1.center = CGPointMake(160, 50);


Feel free to modify the Switchy.m and .h to your liking (add a border, or other things).
Switchy Class is provided for 100% Free.

Enjoy!


Sunday, March 3, 2013

Cocos2D Tutorial: How to Make a Universal Game

Hey guys.

I actually have tonnes of ideas to make tutorials on, but damnit I'm too busy making apps and games
right now. I have 2 apps in the queue and 1 game. My third game is finally using cocos2d. Yeah I know, I am late in the cocos2d bandwagon, but hey, better late than never. And sometimes, it is better
to be late as well ......... ;)


Anyway, here's what we're going to make:


So, today I want to tutor you awesome people (ie programmers, because programmers are awesome people) how to set up your cocos2d project as a UNIVERSAL APP/GAME! As normal, I write tutorials based on what I research/want to do myself. I have been googling for soooo long time to find how to set up universal cocos2d project (ie, include iPhone, iPhone Ret, iPad & iPad Retina), but I just couldn't find any.

So as noobs in cocos2d, I found some pieces of codes in the internet, and play LEGO (ie put them together) and modify it here and there and voila it works.

So first of all, we need to consider about the assets (ie graphics) size. How are we going to make the graphics for universal game that runs and looks good in all iPhone, iPhone Ret, iPad and iPad Retina?
The easiest way to do this, is to crop your "play area" in the confines of iPhone screen ratio.

So in a nutshell, background graphics will be (in pixels):
1. iPhone - 384 x 512.
2. iPhone Retina AND iPad - 768 x 1024
3. iPad Retina - 1536 x 2048

As you can see, the background graphics for iPhone will exceed its screen size, but it's ok, because
we limit the "play area" only in 320x480. Thus the "playable area" for all devices should be set to:
1. iPhone - 320 x 480
2. iPhone Retina AND iPad - 640 x 960
3. iPad Retina - 1280 x 1920

So the area that are non playable must be "padded" with any graphics to make it look nice in iPads.

For this tutorial purpose, we will be creating a platformer with an animated character in the middle.
Just a simple scene of a game. Take a look of the graphics design below. here I just create a background following to the rule we set up above. Keep in mind of the padded areas because those areas will ONLY be visible in iPads, but NOT visible in iPhones. I make the padded area obvious in this example so you can see what I mean. In the real project, use your creativity to make it not so obvious. :D


On to the coding, you need this DeviceSettings.h header. I found this code somewhere (can't remember) and I modded it a bit. This header was originally designed for iPhone, iPhone Retina and then using the iPhone Retina graphics in iPad. This is brilliant because it reduces the amount of assets you need to pack up (and amount of assets you need to make/draw) in a project.

Note that this file is only used to set the location properly (ie adjust location in iPad/iPhone).
The function ADJUST_CCP and ADJUST_XY is particularly useful when positioning/moving sprites. But it is not shown in this example.


//  Created by Emir Fithri Samsuddin on 1/31/13.
//
//

#import <UIKit/UIKit.h>

#import <UIKit/UIDevice.h>

/*  DETERMINE THE DEVICE USED  */
#ifdef UI_USER_INTERFACE_IDIOM//()
#define IS_IPAD() (UI_USER_INTERFACE_IDIOM() == UIUserInterfaceIdiomPad)
#else
#define IS_IPAD() (NO)
#endif


/*  NORMAL DETAILS */
#define kScreenHeight       480
#define kScreenWidth        320

/* OFFSETS TO ACCOMMODATE IPAD */
#define kXoffsetiPad        64
#define kYoffsetiPad        32


/* SD/HD Spritesheet plist */
#define SD_PLIST                @".plist"
#define HD_PLIST                @"-hd.plist"

#define SD_HD_PLIST(__filename__)   \
(IS_IPAD() == YES ?     \
[__filename__ stringByReplacingOccurrencesOfString:SD_PLIST withString:HD_PLIST] :   \
__filename__)


#define ADJUST_CCP(__p__)       \
(IS_IPAD() == YES ?             \
ccp( ( __p__.x * 2 ) + kXoffsetiPad, ( __p__.y * 2 ) + kYoffsetiPad ) : \
__p__)

 
#define ADJUST_XY(__x__, __y__)     \
(IS_IPAD() == YES ?                     \
ccp( ( __x__ * 2 ) + kXoffsetiPad, ( __y__ * 2 ) + kYoffsetiPad ) : \
ccp(__x__, __y__))


#define ADJUST_X(__x__)         \
(IS_IPAD() == YES ?             \
( __x__ * 2 ) + kXoffsetiPad :      \
__x__)

#define ADJUST_Y(__y__)         \
(IS_IPAD() == YES ?             \
( __y__ * 2 ) + kYoffsetiPad :      \
__y__)

#define HD_PIXELS(__pixels__)       \
(IS_IPAD() == YES ?             \
( __pixels__ * 2 ) :                \
__pixels__)

#define HD_TEXT(__size__)   \
(IS_IPAD() == YES ?         \
( __size__ * 1.5 ) :            \
__size__)

Just copy the whole thing and save it as DeviceSettings.h and drag and drop it into your project.

Next.... here's some meddling needed to be done to the cocos2d library.
Under your project, goto libs-> cocos2d -> ccConfig.h

Scroll down to the section where you see a string @"-hd" and add these:


#ifndef CC_RETINA_DISPLAY_FILENAME_SUFFIX
#define CC_RETINA_DISPLAY_FILENAME_SUFFIX @"-hd"
#define CC_IPAD_DISPLAY_FILENAME_SUFFIX @"-ipad"  // -- ADD
#define CC_RETIPAD_DISPLAY_FILENAME_SUFFIX @"-ipadhd" // -- ADD
#endif

Now save it. Next, go to cocos2d->libs->support->CCFileUtils.m

Replace the class method getDoubleResolutionImage with this one:


+(NSString*) getDoubleResolutionImage:(NSString*)path
{
#if CC_IS_RETINA_DISPLAY_SUPPORTED

 if( CC_CONTENT_SCALE_FACTOR() == 2 )
 {
 
        // if iPAD RETINA
        
        if (UI_USER_INTERFACE_IDIOM() == UIUserInterfaceIdiomPad) {


            NSString *pathWithoutExtension = [path stringByDeletingPathExtension];
            NSString *name = [pathWithoutExtension lastPathComponent];
            
            // check if path already has the suffix.
            if( [name rangeOfString:CC_RETIPAD_DISPLAY_FILENAME_SUFFIX].location != NSNotFound ) {
                
                CCLOG(@"cocos2d: WARNING Filename(%@) already has the suffix %@. Using it.", name, CC_RETIPAD_DISPLAY_FILENAME_SUFFIX);
                return path;
            }
            
            
            NSString *extension = [path pathExtension];
            
            if( [extension isEqualToString:@"ccz"] || [extension isEqualToString:@"gz"] )
            {
                // All ccz / gz files should be in the format filename.xxx.ccz
                // so we need to pull off the .xxx part of the extension as well
                extension = [NSString stringWithFormat:@"%@.%@", [pathWithoutExtension pathExtension], extension];
                pathWithoutExtension = [pathWithoutExtension stringByDeletingPathExtension];
            }
            
            
            NSString *retinaName = [pathWithoutExtension stringByAppendingString:CC_RETIPAD_DISPLAY_FILENAME_SUFFIX];
            retinaName = [retinaName stringByAppendingPathExtension:extension];
            
            if( [__localFileManager fileExistsAtPath:retinaName] )
                return retinaName;
            
            
        } else {
        
        
            NSString *pathWithoutExtension = [path stringByDeletingPathExtension];
            NSString *name = [pathWithoutExtension lastPathComponent];
            
            // check if path already has the suffix.
            if( [name rangeOfString:CC_RETINA_DISPLAY_FILENAME_SUFFIX].location != NSNotFound ) {
                
                CCLOG(@"cocos2d: WARNING Filename(%@) already has the suffix %@. Using it.", name, CC_RETINA_DISPLAY_FILENAME_SUFFIX);
                return path;
            }
            
            
            NSString *extension = [path pathExtension];
            
            if( [extension isEqualToString:@"ccz"] || [extension isEqualToString:@"gz"] )
            {
                // All ccz / gz files should be in the format filename.xxx.ccz
                // so we need to pull off the .xxx part of the extension as well
                extension = [NSString stringWithFormat:@"%@.%@", [pathWithoutExtension pathExtension], extension];
                pathWithoutExtension = [pathWithoutExtension stringByDeletingPathExtension];
            }
            
            
            NSString *retinaName = [pathWithoutExtension stringByAppendingString:CC_RETINA_DISPLAY_FILENAME_SUFFIX];
            retinaName = [retinaName stringByAppendingPathExtension:extension];
            
            if( [__localFileManager fileExistsAtPath:retinaName] )
                return retinaName;
            
            CCLOG(@"cocos2d: CCFileUtils: Warning HD file not found: %@", [retinaName lastPathComponent] );
        }
        
 } else if (UI_USER_INTERFACE_IDIOM() == UIUserInterfaceIdiomPad) {
        
        NSString *pathWithoutExtension = [path stringByDeletingPathExtension];
  NSString *name = [pathWithoutExtension lastPathComponent];
  
  // check if path already has the suffix.
  if( [name rangeOfString:CC_IPAD_DISPLAY_FILENAME_SUFFIX].location != NSNotFound ) {
            
   CCLOG(@"cocos2d: WARNING Filename(%@) already has the suffix %@. Using it.", name, CC_IPAD_DISPLAY_FILENAME_SUFFIX);
   return path;
  }
        
  
  NSString *extension = [path pathExtension];
  
  if( [extension isEqualToString:@"ccz"] || [extension isEqualToString:@"gz"] )
  {
   // All ccz / gz files should be in the format filename.xxx.ccz
   // so we need to pull off the .xxx part of the extension as well
   extension = [NSString stringWithFormat:@"%@.%@", [pathWithoutExtension pathExtension], extension];
   pathWithoutExtension = [pathWithoutExtension stringByDeletingPathExtension];
  }
  
        
        NSString *retinaName = [pathWithoutExtension stringByAppendingString:CC_IPAD_DISPLAY_FILENAME_SUFFIX];
  retinaName = [retinaName stringByAppendingPathExtension:extension];
        
  if( [__localFileManager fileExistsAtPath:retinaName] )
   return retinaName;

        
    }
 
#endif // CC_IS_RETINA_DISPLAY_SUPPORTED
 
 return path;
}

Basically I added codes how cocos2d uses the images according to what device.
So we are done "meddling" with the library.

Next lets setup the project as "Universal" (obviously!)

Then we need to enable Retina. Goto AppDelegate.m and add this in applicationDidFinishLaunching anywhere before running the HelloworldScene:
[director enableRetinaDisplay:YES];


Then, lets add code to add the background sprite. Put this in the init method of your HelloWorldLayer.m

       CGSize theScreenSize = [[CCDirector sharedDirector] winSize];

        CCSprite *bg = [CCSprite spriteWithFile:@"tutBg.png"];
        bg.position = ccp(theScreenSize.width/2.0, theScreenSize.height/2.0); // place at center.
        [self addChild:bg z:0];


And when you run the app in iPhone Sim and iPad sims it will look like this:


It works! Wahey! :P

Now I will show you an example of how to load spritesheets accordingly. I mean, what good is an empty scene right?

ANIMATED CHARACTER

Do you like Mortal Kombat? I do. In particular, Scorpion. So lets add him to our scene! Obviously
I'm gonna Google search for animated gif of Scorpion giving an uppercut, extract the frames and make a spritesheets out of them.

I have Zwoptex for spritesheet making (Bought it for $15 for indie license). So from the animated gifs, I created 4 spritesheets. I won't be covering how to make a spritesheet here. But if you make a game, spritesheets are a must! There are other apps to make spritesheet too, Zwoptex is one of them, there are also Texture Packer, and some others.

1. scorpion.png
2. scorpion-hd.png
3. scorpion-ipad.png
4. scorpion-ipadhd.png

Remember that 2 and 3 are the exact same spritesheets! I just create 3 and duplicate the hd or ipad.
(Note: The sprite will look not so good in iPad Retina because I upscaled it the original one by 200%).

Just for fun, lets make the character do an uppercut, everytime we tap the screen. Also, perhaps have
a swoosh sound play as well.

First of all, we need to add the spritesheets (and their corresponding .plist files) into the project.
Then we load them up using this code (put this in init method):

[[CCSpriteFrameCache sharedSpriteFrameCache] addSpriteFramesWithFile:@"scorpion.plist"];
        CCSpriteBatchNode *pieceSpriteSheet = [CCSpriteBatchNode batchNodeWithFile:@"scorpion.png"];
        [self addChild:pieceSpriteSheet];

Note that we don't need to bother anymore with the name extensions since we already set it up nicely in CCFileUtils.m earlier. Marvelous!

Now lets add Scorpion!

// create the sprite from the sprites inside the spritesheet
       scorpion = [CCSprite spriteWithSpriteFrameName:@"SC1.png"];
        scorpion.position = ccp(theScreenSize.width/2.0, theScreenSize.height/3.5);
        [self addChild:scorpion z:1];

Note that we use "spriteWithSpriteFrameName" because we want to load an image from the spritesheet and not directly from the resource files (in which case we used "spriteWithFile"). Also do declare CCSprite *scorpion in the header.

So next, we enable touches.
Pretty easy, inside your HelloWorldLayer.m init method add this code:


 [[CCTouchDispatcher sharedDispatcher] addTargetedDelegate:self priority:0 swallowsTouches:YES]; // allows touches

Then add a delegate method to capture touches and add animation to the scorpion sprite and play the animation once.


- (BOOL)ccTouchBegan:(UITouch *)touch withEvent:(UIEvent *)event {
    // if u need touch location u can use this, but in this example we're not going to bother with location
    // CGPoint touchLocation = [self convertTouchToNodeSpace:touch];
    
    NSMutableArray *scorpionArray = [NSMutableArray array];
    
    // load all the sprites into the array
    for (int i=1; i<=32; i++) {
        [scorpionArray addObject: [[CCSpriteFrameCache sharedSpriteFrameCache] spriteFrameByName:[NSString stringWithFormat:@"SC%d.png",i]]];
    }
    
    CCAnimation *scorpionAnim = [CCAnimation
                                 animationWithFrames:scorpionArray delay:0.05f];
    CCAction *scorpionAction = [CCRepeat actionWithAction:
                                [CCAnimate actionWithAnimation:scorpionAnim restoreOriginalFrame:NO] times:1];
    [self.scorpion  runAction:scorpionAction];

    
    return TRUE;
}

Also, add a sound. Sounds in cocos2d are simple to use. First import #import "SimpleAudioEngine.h" and just call [[SimpleAudioEngine sharedEngine] playEffect:@"uppercut.wav"]; where uppercut.wav is the soundfile that you added to your project. So go ahead and add this line just above "return TRUE;" line in the method above.

And.. we're DONE!


Stay tune for more cocos2d tutorial. I have another one in mind that will surely be useful to a lot of us.